Amaryllis Care
Latin Name: Hippeastrum
Our bulb size: 28-32 cm
Amaryllis are tropical bulbs, native to South and Central America, prized for their willingness to produce large, colorful flowers indoors in the dead of winter. They are absolutely reliable and largely carefree, which makes them a fabulous gift for anyone on your list, gardener or otherwise. Though many devotees grow fresh bulbs each winter, the plants will, with proper care, rebloom year after year. In Zones 8-10, Amaryllis also make gorgeous garden plants in the growing season.
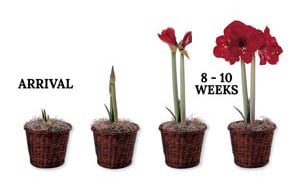
Anyone who has experienced growing an Amaryllis plant knows that a bigger bulb means bigger (and more) flowers; our premium-grade bulbs are, with few exceptions, the largest commercially available. They require only warm temperatures, strong light, and water to deliver a truly spectacular performance about 8-10 weeks after receipt. Because they bloom indoors in winter, Amaryllis are popular Christmas gifts, and are perfect for anyone searching for flower bulbs to send for Christmas.
After decades of growing Amaryllis, we continue to be amazed at the variety offered by these spectacular blooms, and are proud to offer a selection that we believe is unrivaled in this country. Each variety has been trialed in our greenhouses and homes here in Connecticut. To help you enjoy and indulge others in the uplifting mid-winter flower show provided by these dazzling blooms, we offer our premium Amaryllis bulbs in a variety of ways: Choose a pre-potted bulb in a decorative cachepot, pot or basket; a bulb in a glass vessel; a bareroot bulb that you pot yourself; or, if you prefer just to enjoy gorgeous Amaryllis blossoms on demand, order one of our stunning cut-flower bouquets. Whatever you select, our top-grade bulbs are easy-to-grow and guaranteed to succeed. Little wonder they are a favorite gift year after year.
Growing Amaryllis
Our Amaryllis bulbs ordered online arrive either bareroot which you can plant into your own pots, as part of kits that can be assembled at home, or pre-potted in baskets and a wide range of pots and cachepots, depending on the variety. The South African Amaryllis begin shipping in September and the Dutch Amaryllis begin shipping in November.
Pre-potted Amaryllis Bulbs
Amaryllis sent already potted need only a thorough watering with lukewarm water to begin growing. Then follow the "Pre-bloom Care" instructions below.
Please note: These Amaryllis are shipped with packing material on top of each pot. Carefully remove the packing material around the potted bulb and discard it.
How to Plant Amaryllis Bulbs in Pots
- Amaryllis shipped in bags require potting. Begin by selecting a pot for your bulbs. If planting individually, choose a 6-7" pot. If planting a group of 3 bulbs, choose a 10-12" container.
- Place a well-drained potting mix in a plastic tub. Slowly add warm water and stir with your hand until the mix is moist but not soggy. Then fill the pot about half full with potting mix, set the bulb on top of the mix and fill in around the bulb with additional mix. Adjust the position of the bulb as needed, so that the top third of the bulb is exposed.
- The final level of the mix should be about 1/2" below the rim of the pot to allow for watering. Firm the mix and water lightly to settle it around the bulbs. Then follow the "Pre-bloom Care" instructions below.
How to Pot Amaryllis Bulbs Video
Please note: Some of our Amaryllis kits are shipped with a disk of potting medium (Cocopeat). Follow the directions on the package for rehydrating the disk. Fill the pot about 1/2 full with Cocopeat, set the bulb on top, and fill in around the bulb with additional Cocopeat. Adjust the position of the bulb as needed so that the top 1/3 of the bulb is exposed. Do not be concerned if the final level of the Cocopeat is down inside the pot. Firm the Cocopeat and water lightly to settle it around the bulb. Then follow the “Pre-bloom Care” instructions below.
Pre-Bloom Care of Amaryllis
- Place the pot where the temperature remains above 60°F.
- The warmer the temperature (70-80°F night and day is ideal), the faster the bulb will sprout and grow.
- Providing bottom heat (by setting the pot on a propagation mat or on the top of a refrigerator) may help stimulate growth.
- Water only when the top inch of the potting mix is dry to the touch. Watering more frequently, particularly just after potting, can cause the bulb to rot.
- If the pot is covered with Spanish Moss, lift the moss and pour water directly on the potting mix.
- Growth generally begins in 2-8 weeks. Certain varieties of Amaryllis may take more time to sprout. As long as your bulb remains firm, be patient and take care not to overwater.
- As soon as the bulb sprouts, provide ample sunshine; a south-facing window or a sunroom is ideal.
- Rotate the pot frequently to prevent the flower stalks from leaning toward the light.
- The flower stalks may require support to keep from toppling. Click here for our Amaryllis stakes that are ideally suited to this purpose.
Cutting Amaryllis Stems for Bouquets
- The best time to cut the flower stems is when the first bud has colored and is just ready to open. This will ensure that the rest of the buds on the same stem have formed sufficiently and will open fully.
- Make a straight cut across the bottom of the stem, so the stem will rest evenly inside the vase.
- Because the stems are hollow, the bottom may split and curl up, but this will not affect the blooms.
- Adding a floral preservative to the water and changing the water regularly will help prevent stem rolling and lengthen the life of your bouquet. Remove individual flowers as they fade.
- If kept at temperatures of 60-70°F, your cut Amaryllis flowers will last for up to 10 days.
Growing Amaryllis Outdoors
- Amaryllis bulbs can be planted directly in the ground in areas where temperatures do not go below 10°F (Zones 8-10), or in zone 7 for cold-tolerant species that we sell for spring planting. Choose a site with full sun (at least 6-8 hours of direct sun daily) and well-drained soil.
- In frost-free areas, plant the bulb with the neck at, or slightly above, ground level. In areas where some frost may occur, the bulb should be set with 5 or 6" of soil above it, followed by an application of 4 or 5" of fine mulch.
- Water the area thoroughly after planting. Once growth starts, water only if rain is infrequent and the top 2" of soil are dry.
- After the leaves appear, fertilize with a balanced fertilizer (such as 10-10-10); repeat once a month through April.
- When plants are done blooming, remove the flower stalks. Be sure to leave the foliage on the plant so the leaves can produce food that will be stored in the bulbs. If leaves turn yellow, cut them off at the base.
- From June through September, water only during prolonged dry periods.
- In fall, provide a layer of winter mulch for cold-tolerant species grown in zone 7.
- Amaryllis are not hardy for us in northwestern Connecticut where we treat them like annuals in the garden. They are generally considered tender perennials. Most varieties are only perennial (hardy outdoors) in zones 9 to 11.
Amaryllis Care After Blooming
- After flowering, your bulb is exhausted. If you want flowers next year (many people prefer simply to purchase new bulbs every fall), you must allow it to rebuild itself.
- When the last bloom fades, cut off the flower stalk 3-5" above the bulb, but do not cut off the leaves. They produce food that will be stored in the bulb.
- Put your plant in a sunny window, preferably one that is south-facing.
- Water when the top inch of the potting mix is dry to the touch, and begin fertilizing with a balanced, water-soluble fertilizer once a month.
- When the danger of frost has passed in spring, set the pot outdoors in full sun or knock the bulb out of its pot and plant it in the ground in a sunny location.
- In fall—we often wait until frost blackens the leaves—bring the bulb indoors, cut off the foliage just above the bulb, and store it dry in a cool (55°F), dark place such as a basement for 8-10 weeks.
- Then pot (or repot) the bulb and water it. Thereafter, keep the potting mix almost dry until new growth emerges, and follow the instructions under "Pre-bloom Care."
- Amaryllis bulbs can rebloom once or sometimes twice a year for decades if they receive proper care and are repotted as they grow.
Growing Amaryllis in Stones and Water
- These large bulbs will grow happily and bloom abundantly in nothing more than stones and water.
- To "plant" your bulb, begin by carefully placing river stones or pebbles to a depth of about 2-4" in our vase or your own container.
- With scissors, trim off any roots on the bulb that are brown and dried*, but let the roots that are whitish and fleshy remain.
- Place the Amaryllis bulb, roots down, on top of the stones, then put the remaining stones around the bulb, leaving the top third of the bulb exposed.
- Finally, add water until the level reaches about 1" below the base of the bulb but no higher. If the base of the bulb sits in water, it will rot.
- After planting, set the container on a sunny windowsill in a room where the temperature remains above 60°F. The warmer the temperature (70-80°F night and day is ideal), the faster the bulb will sprout and grow. Check the water level daily. Add water as needed to keep the level below the base of the bulb.
- A shoot will emerge from the top of the bulb in 2-8 weeks; you may (or may not) see thick white roots pushing between the stones before then. Rotate the container frequently to prevent the flower stalks from leaning toward the light.
- After the last blooms fade, we recommend that you dispose of the bulb; Amaryllis grown in water may not perform well in subsequent years. However, if you do wish to continue growing the bulb, follow the instructions given in "Potting the Bulbs" and "Amaryllis Care After Blooming."
*We recommend trimming dried roots off because they will decompose in water over time. Adding aquarium charcoal to the river stones will also help prevent any odors.
Additional Flower Bulbs to Consider for Christmas Gifts
If you are looking for other flower bulbs in addition to Amaryllis to send as Christmas gifts, we offer a wide selection of Paperwhite Narcissus Bulbs as well as Indoor Bulb Gardens. Your friends and family will love watching these bulbs grow. For detailed information about when these forced bulbs begin shipping and how long they take to grow and bloom, please see the product page for each item.
Amaryllis—The White Flower Farm Difference
The Connoisseur's Collection of Amaryllis
Time Lapse: Growing Amaryllis
Amaryllis We Offer:


Double Amaryllis Images:
South African Amaryllis Images:
Shop Early Blooming South African Amaryllis