Plant Care
On this page we answer common gardening questions about Gardening for Beginners, Garden Design, Plant Care, Gardening in Pots, Pollinators and Soil.
Gardening for Beginners
Garden Design
How to change the look of your garden
How to combine flowers in the sun
How to plant for color all season
How to use color themes in garden design
Learn about plant hardiness zones
List of North American Native Plants
Tips for garden design: plant in threes
Plant Care
All my plants were planted at the same time, why are some not growing yet?
How can I control slugs in my garden
How can I keep deer and rabbits away from my garden
How do I tell the top of a bareroot plant from the bottom
How to care for plants after planting
How to grow plants in the south
How to grow vines and climbers
How to protect plants from frost
Isn't it too early to plant? We're still having frost!
Learn about Dahlias & Begonias
Leaves in my garden have a white coating on them. What's wrong?
Leaves keep turning yellow on my houseplant. What's wrong?
Leaves of my newly, planted perennial look wilted, what should I do?
List of perennials that wake up late
My plants are not as tall as the height in your catalog. Why?
Something is destroying leaves on my lilies - What can I do?
The leaves on my plant feel, sticky. What is wrong?
We're expecting a frost - How can I protect my new plants?
What are the symptoms of overfertilizing?
What are the symptoms of overwatering?
What can I do to control aphids?
What is causing my clematis vine to wilt?
What to do if you have to delay planting?
What to do when your order arrives?
Why didn't my new perennials or shrubs bloom the first year?
Gardening in pots
How to create a dramatic patio container
Pollinators
How to attract butterflies to your garden
How to attract hummingbirds to your garden
List of plants for pollinators that we offer
List of plants in our pollinator garden
Soil
GARDENING FOR BEGINNERS
How to care for plants
Click here to learn how to care for plants.
(Back to top)
How to design a garden
Click here to learn how to design a garden.
(Back to top)
GARDEN DESIGN
How to change the look of your garden
Creative gardeners like to display their old favorites in new ways. Perking up summer borders with bulbs and converting a section of sunny lawn into a field of Lavender are ideas we describe here. But containers offer the broadest design opportunities for every plant type -- from annuals, bulbs, and perennials to shrubs and trees.
Flank an entrance with a matching pair of flowering shrubs or evergreens; plant a magnificent urn for a garden focal point; train vines on tuteurs set in big tubs. Window boxes, strawberry pots, and hanging baskets offer versatile solutions that can change with each season. For spur-of-the-moment garden whimsy, plant colorful annuals in oddball containers: a rusted coal scuttle, wheel barrow, rubber boot, doll cradle, colander, old tool tote -- whatever strikes your fancy. Remember, though, that small containers look best in groups of similar materials. Look for more inspirations in the Reading Room of our Gardening Help section.
Growing requirements are typically the same for container plants as those in the ground, except that they will need more frequent watering and feeding. Use a moistened potting mix and give the pot a good soaking after planting, then let the soil dry to the touch before watering again. With shrubs, slower growing species are the best choice for containers; allow enough space to fit the root ball comfortably. Check our Growing Guides for information on specific plant requirements. Enjoy!
(Back to top)
Like people, plants have specific needs that when met, allow them to develop to their full potential. Selecting plants whose cultural requirements suit the conditions of your garden is the best way to assure success and cut down on time caring for them. Among the most important considerations of a site is soil drainage. Most plants will thrive in moist, well-drained soil. If your drainage is less than perfect -- too slow or too fast -- it can be improved somewhat by adding organic matter, but it is often the best course to start with plants suited to your existing soil.
Some soils drain slowly and tend to stay damp most of the time; for these soils, select plants that tolerate abundant moisture. Other soils may be light or sandy and tend to dry out quickly; for these soils, plants that tolerate drought will perform best. Fortunately, there are plants suited to both of these conditions.
Plants for Wet/Damp Soils
Many trees thrive in heavy or damp soils; Sweet Bay Magnolia (Magnolia virginiana), Red Maple (Acer rubrum), and Arborvitae (Thuja 'Green Giant') are just a few. Many outstanding shrubs tolerate wet soils, including Ninebark (Physocarpus opulifolius Little Devil®), Red Osier Dogwood (Cornus sericea Arctic Fire®), the native Winterberries (Ilex verticillata 'Winter Red' and 'Southern Gentleman'), and American Cranberrybush (Viburnum trilobum 'Wentworth'). Many perennials are adaptable to moist soils. Some of the top choices for such conditions are: Jack-in-the-Pulpit (Arisaema), Lily-of-the-Valley (Convallaria majalis), Bleeding Hearts (Dicentra), Beebalm (Monarda), Brunnera macrophylla, Hibiscus moscheutos, and Ferns.
Plants that Tolerate Drought
If your conditions dictate that drought tolerant plants are in order, your choices are equally abundant. Good trees for dry conditions include Ginkgo, Honeylocust (Gleditsia triacanthos), Pin Oak (Quercus palustris), and Golden Rain Tree (Koelreuteria paniculata). Drought tolerant shrubs include: Butterfly Bush, such as Buddleia davidii 'Purple Emperor', Bush Clover (Lespedeza thunbergii 'Gibraltar'), and Smoke Bush (Cotinus coggygria 'Royal Purple'). Choices for perennials that thrive in droughty conditions are extensive. Some of the best include: Yarrow (Achillea), Hummingbird Mint (Agastache 'Tutti Frutti'), Tickseed (Coreopsis 'Sienna Sunset' and 'Mercury Rising' and Coreopsis verticillata 'Moonbeam'), Purple Coneflowers (Echinacea), Blanket Flower (Gaillardia Gallo® Peach), Lavenders, and Catmint (Nepeta 'Walker's Low').
By realistically assessing your garden site and doing a bit of research to select plants that will adapt to your conditions, your plants will be happier - and you will be too!
(Back to top)
How to combine flowers in the sun
The cheerful, long-blooming Daisy-like flowers of Echinacea can anchor a border all summer long and need only modest care to perform beautifully. Plants may require supplemental watering to become established in their first season, but become thrifty in future years.
If watering is an issue in your garden, combine Echinacea (Purple Coneflower) with Buddleia (Butterfly Bush), Achillea (Yarrow), and Panicum (Switch Grass) for a long-lasting, water-wise -- and deer-resistant -- display that butterflies will love. This combination is also a good source of cut flowers.
Flowers that grow in spikes or spires offer a good contrast to the rounded Daisy form of Echinacea. We like Buddleia and Veronicastrum in the back of the border, Liatris 'Kobold' in the front, and Veronica alongside.
Bright, sturdy flowers benefit from association with soft, almost fuzzy blooms. Try Nepeta (Catmint), Pennisetum (Fountain Grass), or Monarda (Bee Balm). The bright pink, white, or dark red bottlebrush blossoms of Sanguisorba (Burnet) create a cloud of color that is a perfect foil for Echinacea.
Old favorites such as Hemerocallis (Daylilies), Garden Phlox, and Sedum are easy-going, easy-growing perennials that also make excellent partners for Echinacea and many other plants that perform best in full sun.
(Back to top)
How to keep a garden journal
Click here to learn about the benefits of keeping a garden journal.
(Back to top)
How to plant a garden
Click here to learn how to plant a garden.
(Back to top)
How to plant bulbs
Click here to learn how to plant bulbs.
(Back to top)
How to plant for color all season
Gardens change with the season, so it takes a bit of planning to have color from shrubs and perennials in the garden from spring to fall. Although planning for a sequence of bloom and continuing visual interest can be daunting, think of it as a great opportunity to get acquainted with a variety of new plants. These suggestions will get you started.
For each season, create one or two colorful centers of interest that include blooming shrubs, which give structure to borders. For balance, distribute plant groupings throughout the garden that will be attractive even when not in flower. Build compositions around long-lasting, reliable perennials like Peonies, Daylilies, and Hosta.
Start with spring bulbs, then tuck in Lilies and other summer blooming bulbs to enjoy later. Some spring perennials have dormant periods, so other plants can fill their spaces with summer color. Overplant Daffodils with Daylilies with our Collaboration collection, for example, or fill in the blanks with annuals. Think about getting a second season of interest from plants that have ornamental fall seed heads, such as Blackberry Lilies (Belamcanda).
Get extra color mileage from foliage, in summer as well as fall. Include shrubs with variegated or colorful leaves -- the variegated Pagoda Dogwood Golden Shadows(tm) and wine purple Physocarpus, and perennials like Heuchera and Hosta come to mind. Think about fall foliage color, too. Hakone Grass (Hakonechloa) and other perennials offer great fall color.
(Back to top)
How to use color themes in garden design
Every gardener feels drawn to certain colors. One way to play with design schemes is to focus on a single favorite color. Generally, the pastel "tints," as well as the darker "tones," of that color will all work well when grouped together. This is especially true for yellows, purples, and blues. Of course, you pretty much can't go wrong with green, Nature's most ubiquitous hue. It looks good with every other color, either as a kindred spirit, or as a contrasting foil.
Another simple approach is to choose a color and then bring in a close relative on the spectrum, such as pairing yellow with orange or combining purples with blues. These are called color harmonies, and they tend to look reliably pleasing.
Here's one caveat to consider: not all colors within the red family always get along. If red is a favorite color, try to sort out "cool" reds -- which have some blue or violet mixed in -- from "warm" reds that have orange or brown in their makeup. Some say it's best to separate the shades, but it's not a hard-and-fast principle. Just be aware that designing with reds can be a bit trickier than playing with easy-going yellows. Then rely on your designer's eye to decide if certain colors are pleasing together.
When you want some contrast, the easiest way is to just look for a color's opposite, or complement. For yellow, that's purple. For orange, that's blue. And for red, it's the Christmas complement of green. To find more subtle opposites, pick up a color wheel that will reveal a complete spectrum of opposites and relatives.
The main thing is to have fun playing with color. The hues of a garden's palette constantly change from season to season, so enjoy the shifts and tweak your designs as the plantings evolve. For more design ideas and information, take a tour with nursery manager Barb Pierson in our "Garden Inspirations" video, or browse articles in the Growing Guides by Plant Name section of our Web site.
(Back to top)
We call Tulips the "lipsticks of the garden" because they provide an elegant finishing touch to spring borders. Lush double-flowered Tulips add even more flair. The long-lasting, semidouble to double flowers of these Tulips bear a striking resemblance to double Peonies. Many arrive in May, when most otherTulips have finished their show. All are good for bedding and as cut flowers, and some are excellent for forcing. Most double-flowered Tulips are hardy to Zone 3.
To use this group of bulbs in your garden, throw away all your preconceptions about planting Tulips and start with a fresh look at each variety. For the best display, avoid the "soldier effect" and space these elegant bulbs in natural-looking clusters, about five to six inches apart from each other. Tulips prefer well-drained, good garden soil. Sandy soil enriched with organic matter is ideal, as is a pH of 6.0 to 6.5. Full sun is recommended (at least six hours or more). Keep Tulip bulbs cool (below 65 degrees) until you are ready to plant them and make sure to put them in the ground at least a month before the soil freezes. Water them in well.
Plant double-flowered Tulip varieties in splashes in the perennial border, near an entrance, or fill a prominent bed with these beauties. Feature a fragrant Tulip, such as 'Orca', where you're sure to enjoy its scent. Create thrilling drama by combining two or more double Tulips, such as the ones showcased in our Touch of Perfume Tulip Collection or our May Romance Tulip Collection. Many double Tulips that are 10-14 inches tall work well in the front of a border.
Double Tulips look lovely with other spring bloomers; their full-bodied blooms serve as especially pleasing accents for Peonies. Underplant pastel shades of double Tulips with Forget-Me-Nots for a classic combination. Tulips also look perfect planted among ground covers like Epimedium or Vinca. In any case, plant abundantly in order to have plenty for arrangements.
Many Tulips (the midseason and late-flowering varieties in particular) tend to bloom magnificently the first spring or two after planting and decline thereafter. Species Tulips, Darwin Hybrids, Fosterianas, Greigiis, Kaufmannianas, and WFF Perennial Tulips can put on a stunning display for several years with your help.
(Back to top)
Learn about plant hardiness zones
Click here to learn about plant hardiness zones.
(Back to top)
List of deer-resistant plants
Click here for a list of deer-resistant plants.
(Back to top)
List of Moon Garden plants
Click here for a list of Moon Garden plants.
(Back to top)
List of North American Native plants
Click here for a list of North American Native plants.
(Back to top)
List of salt-resistant plants
Click here for a list of salt-resistant perennials.
(Back to top)
Three is a popular number in many aspects of culture, including design. There are triads and trios in music, three-act plays, and triptychs in art. The "rule of threes" is a key principle in comedy.
In planting design, three is often considered a magic number. It's an easy way to think about planting for pleasing impact. In general, odd numbers are useful in creating dynamic, natural-looking plantings. (Rely on even numbers, such as pairs, for more formal effects.) If three of one plant doesn't pack enough punch, plant it in fives or sevens. Masses of a single plant catch the eye while plantings with lots of "onesies" and "twosies" can look jumbled or too fussy.
But some garden situations call for more than trios or quintets. When you're looking to cover serious ground or make a really big impact, create volume by massing dozens of the same plant, such as Lily-of-the-Valley. The eye ceases to grasp the actual numbers and instead takes in the sweep of a scene.
When reprising an element in a garden's design, try to repeat it at least three times. This holds true for both plants and hardscaping elements. You can repeat a color, a shape, or a specific plant, such as a series of three Hydrangeas as a backdrop for a border. Create a sense of rhythm in your garden by repeating elements with attention to the frequency. When in doubt, count to three.
(Back to top)
PLANT CARE
All my plants were planted at the same time, why are some not growing yet?
Plants, even those of the same variety, can vary in their overall rate of growth as well as the time when they begin to grow each year. Allow new plants 2-4 weeks after planting to make their appearance. Some plants, notably Asclepias, Baptisia, Hibiscus, Platycodon, and Wisteria are extremely slow to break dormancy the first year after planting, often taking 6-10 weeks to leaf out. Dormant plants put into the garden in fall won't show signs of growth until next year.
Dormant woody plants, whether bareroot or pot-grown, vary wildly in the timing of their return to active growth. If a plant is slow to leaf out, gently scratch the bark near the base of the plant with your fingernail. If the inside is green, the plant is still alive and is just taking its time. Please be patient.
(Back to top)
How can I control slugs in my garden?
Set out shallow bowls of beer (any inexpensive brand is effective) to catch and drown slugs and snails. Thin strips of copper seem to create an effective barrier when wrapped around the bottom of plant pots or formed into a collar on the ground around favorite plants. You might also try using diatomaceous earth (available at many garden centers) as a barrier or (in the South) mulch with Zoysia clippings.
(Back to top)
How can I keep deer and rabbits away from my garden?
The most permanent (and costliest) defense against deer is a fence that is 8ft high. To deter rabbits, install a fence that is 3ft above ground, with 12in buried below ground. Repellent sprays work with varying degrees of effectiveness. Try alternating 2 or 3 different types and apply them as often as recommended by the manufacturer.
(Back to top)
How do I tell the top of a bareroot plant from the bottom?
It's not always easy to tell which end of a bareroot perennial is up. In their dormant state, some plants Ferns and Liatris are good examples may lack obvious roots. Look for buds or the remains of stems and leaves, and plant them facing up. When in doubt, lay the crown on its side; the plant knows to send shoots up and roots down.
(Back to top)
How to care for plants after planting
Click here to learn how to care for plants after planting.
(Back to top)
How to grow Amaryllis
Click here to learn how to grow Amaryllis bulbs.
(Back to top)
How to grow annuals
Click here to learn how to grow Annuals.
(Back to top)
How to grow bulbs
Click here to learn how to grow bulbs.
(Back to top)
How to grow Dahlias
Click here to learn how to grow Dahlias.
(Back to top)
How to grow Daylilies
Click here to learn how to grow Daylilies.
(Back to top)
How to grow garden plants
Click here to learn how to grow garden plants.
(Back to top)
How to grow houseplants
Click here to learn how to grow houseplants.
(Back to top)
How to grow kitchen garden
Click here to learn how to grow a kitchen garden.
(Back to top)
How to grow perennials
Click here to learn how to grow Perennials.
(Back to top)
How to grow plants in the south
Click here to learn how to grow plants in the south.
(Back to top)
How to grow shrubs
Click here to learn how to grow shrubs.
(Back to top)
How to grow vines and climbers
Pot-Grown Woody Plants:
Pot-grown plants with leafy new growth need a gradual introduction to direct sun and wind before planting. Set plants outdoors in a sheltered, lightly shaded spot, increasing their exposure to sun and wind each day. After 7-10 days, they'll be ready to go in the ground.
Before planting, check the potting mix in the pot and water thoroughly if it's dry. Dig a hole slightly larger than the pot. For pot-grown woody plants that are to be planted in unimproved soil, dig a hole 3-5 times the diameter of the root ball but no deeper than the height of the root ball. Remove the plant from the pot by grasping the rim, turning the pot upside down, and tapping it against the heel of your hand. If the plant is root-bound (the root ball matted with roots to the point that they obscure the potting mix), gently break up the sides of the ball with your thumbs and tease apart roots that are circling at the bottom. This encourages roots to grow into the surrounding soil. Set the root ball in the hole so that the top of the ball is level with the surface of the soil. Then push soil around and just over the top of the root ball and firm the soil by pressing down with both hands. Make a rim of soil around the edge of the planting hole to form a basin, which will hold water and channel it to the roots. Finally, fill the basin with water several times.

Bareroot Vine:
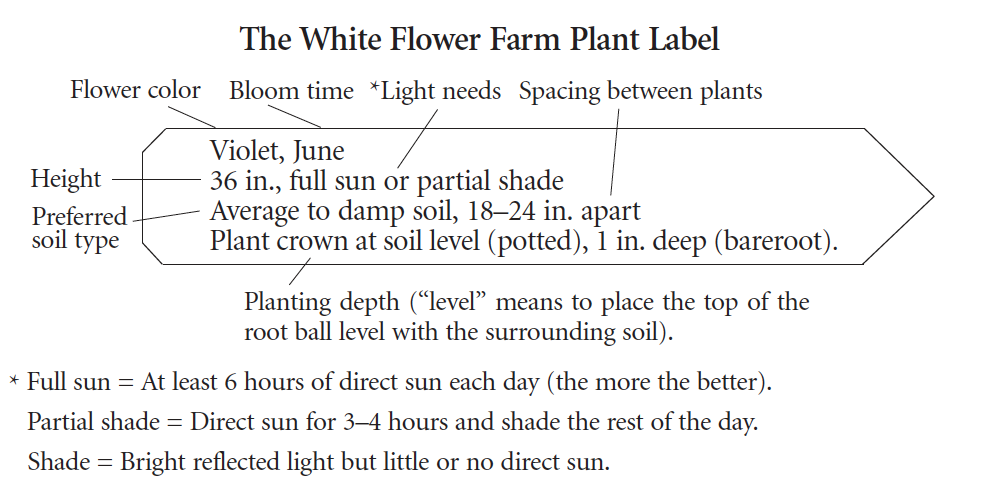
Unwrap the vine just before you're ready to plant. Soak the roots for a few hours. The roots of many woody plants are brittle, so take care not to break them. Dig a hole wide enough to accommodate the spread of the roots and deep enough to allow you to set the crown the point where the leaves or stems of the plant meets the roots 1in below the surface of the soil. (Some plants require deeper planting, other shallower planting - see the White Flower Farm plant label.) Place the roots in the planting hole and arrange them in whatever fashion appears natural. Holding the crown of the plant, push soil into the hole, working soil around the roots. After planting, make a rim of soil around the edge of the planting hole to form a basin that will catch water and channel it to the roots.
(Back to top)
How to plant bareroot Roses
Click here to learn how to grow bareroot Roses.
(Back to top)
How to protect plants from frost
As this is written in early November, it's still too early to apply winter protection to newly-planted perennials, but it's not too early to plan for it, if you garden in a cold-winter area (USDA Zone 6 [-10°F] or colder).
Although you might think a winter mulch keeps plants warm, it's intended to do the opposite - to keep the ground frozen, instead of repeatedly thawing and refreezing. That freeze-thaw seesaw can heave lightly-rooted plants right out of the ground, leaving their roots vulnerable to freezing or drying out fatally. Perennials planted or transplanted in the fall are especially susceptible during their first winter.
How to start seeds
Click here to learn how to start seeds.
(Back to top)
Isn't it too early to plant? We're still having frost!
Hardy perennials, shrubs and vines can easily withstand moderate frosts especially if they are still dormant. Annuals and tender perennials can be kept in their pots for a week or two until the weather warms sufficiently and the danger of frosts has passed.
(Back to top)
Learn about Dahlias & Begonias
Long-blooming Dahlias and Tuberous Begonias share many traits. Both emerge from tubers which can be started in pots indoors to give them a head start before going outdoors after the danger of frost has passed. They prefer well-drained rich soil and even moisture. Neither are cold hardy but their tubers can be stored over winter. Just dig them up in fall and protect them in a cool place. Click here to watch our videos "How to Grow Tuberous Begonias" and "Dividing Dahlias." You'll also find complete instructions for each in our Growing Guides by Plant Name. The bloom season for both Dahlias and Begonias begins in July although for some varieties the show starts later. Usually flowering continues until late in the season when most perennials have faded. Both Dahlia and Begonias produce rounded blooms in many different colors. Dahlias are legendary as cut flowers. Most have long strong stems and the blossoms last up to a week or longer in a vase. Plants respond well to cutting and bloom even more. While Begonia flowers are more delicate they look lovely floating in a bowl of water. There are also significant differences. Some Begonias have a fresh citrus-like scent ('John Smith' and Scentiment® Blush for example) while most Dahlias have no fragrance. The heights of Dahlias vary dramatically from petite to statuesque. Upright Tuberous Begonias top out around 2ft and the trailing types are ideal for hanging baskets. Begonia flower sizes range from 2-6in in diameter while some Dahlia blooms grow as big as dinner plates. Dahlias like full to part sun while Begonias prefer part sun to full shade. Dahlia tubers multiply rapidly but Begonia tubers are slow to propagate and thus more expensive. Begonias and compact Dahlias such as the Melody varieties thrive in containers. This gives them even more versatility. Dahlias that grow taller than 24in will benefit from being staked. This is especially true for garden varieties with large flowers such as those in our Dinnerplate Collection. Take care when pushing the stake into the soil to avoid injuring the tuber. Dahlias make great filler plants in middle of borders planted in 3s or 6s. Or to create an extravagant show plant Dahlias in a mass using multiples of Our Shades of Pink Collection or the Karma Dahlia Collection.
(Back to top)
Leaves in my garden have a white coating on them. What is it?
The leaves of certain plants (such as Phlox and Pulmonaria) are more susceptible to a fungus called powdery mildew especially when soil conditions are dry. Water deeply during dry spells to reduce the incidence of disease and dust with sulfur (available at garden centers) beginning in early summer. Thinning half the shoots of Phlox when 6in tall in spring also provides better air circulation and helps keep mildew at bay.
(Back to top)
Leaves keep turning yellow on my houseplant. What's wrong?
Check among the leaves and stems to see if there are webs. If so your plant has spider mites (which are not insects but related to spiders). Use a plant spray that is specifically labeled for the control of these pests such as BioNeem and follow the manufacturer's directions. Try to increase the humidity around your plant as well as spider mites thrive in dry conditions.
(Back to top)
Leaves of my newly planted perennial look wilted what should I do?
Check the soil around the plant with your finger to a depth of about 1in. If the soil is dry water thoroughly. But if the soil below the surface is moist to the touch don't water. The plant is probably wilting because the roots are unable to supply the top with sufficient moisture even though the soil is damp. The remedy is to provide temporary shade for the plant. Within a week or so the roots should catch up and you can remove the shading. Please note: Overwatering causes a plant's roots to rot and its leaves will then wilt because they are not receiving sufficient water.
(Back to top)
List of perennials that wake up late
As spring begins in our garden we greet every new sprout with joy as we search for signs of life in our beds and borders. It's also the time of year when patience can be required -- perennials shrubs and bulbs do not all emerge simultaneously. We all kind of know that but it's easy to forget in our eagerness.
The message is: don't despair just yet if a plant is late to the party. It could very well still be sleeping not dead.
Here are some of the perennials and shrubs we've found to be the last to wake up:
Leadwort (Ceratostigma) Milkweed (Asclepias) False Indigo (Baptisia) Ferns Balloon Flower (Platycodon) and Hibiscus including the shrub Rose of Sharon (Hibiscus syriacus). Bloodroot (Sanguinaria) can be tardy the first year after planting. Lady's Slipper Orchids (Cypripedium) Solomon's Seal (Polygonatum) and False Solomon's Seal (Smilacina) sometimes don't appear above ground at all the first year after planting. If it's been a very wet winter Astilboides and Darmera can also be painfully slow. Clematis is sometimes poky in its first spring after planting.
Among the bulbs Daffodils and Lilies can be slow in their first spring after planting.
Sweet Pepperbush (Clethra alnifolia) is among the last shrubs to leaf out. Wisteria and Trumpet Creeper (Campsis) are also slow. Hydrangea arborescens 'Annabelle' Caryopteris and Buddleia may die back to the ground -- prune off the deadwood and the plants will break from the stubs that remain.
(Back to top)
My plants are not as tall as the height given in your catalog. Why?
Many factors such as climate soil type rainfall amount of sun and fertilizer can affect the size of any plant. Keep in mind that many plants also do not reach their full height the first season after planting.
(Back to top)
Something is destroying leaves on my lilies - What can I do?
If there are soft-bodied larvae and scarlet and black adult beetles about ½" long on your plants they are lily leaf beetles. They are serious pests that were first introduced in the Boston area in the early 1990s but have spread into other New England states and even Canada. Pick the adults and larvae off your plant and drop them into a container of soapy water and squish any orange-red eggs attached to the undersides of the leaves. If handpicking isn't practical for you spray your plants with BioNeem (following the manufacturer's directions).
(Back to top)
The leaves on my plant feel sticky. What is wrong?
This sounds like scale insects. They look like tiny bumps about the size of a sesame seed on the undersides of leaves and along stems. Horticultural oil sprays such as our Neem Oil are the most effective way to control these pests. Be sure to follow package directions on use and frequency of spraying.
(Back to top)
True Lilies from the genus Lilium are often confused with Daylilies Hemerocallis. True Lilies produce a single stem often tall from a bulb. The leaves grow on the stem. Daylilies grow from tubers that produce a large tuft of foliage from which emerge leafless stems (called scapes).
Because they are tall and slender Lilies fit easily between other plants. Tuck two or three between the crowns of other perennials towards the back of the border. Lilies can add color where Peonies Baptisia and other early summer bloomers have subsided to green. Lilies can also complement summer bloomers. Try Asiatic Lilies which bloom first with Salvia Geranium Centaurea or Heuchera. Orienpet Lilies (crosses between Trumpet and Oriental Lilies) are the next group to bloom. They enhance Campanulas and all the Daisy-type flowers: Echinacea Coreopsis Gaillardia Leucanthemum. Oriental Lilies the last to bloom are lovely with Phlox Ornamental Grasses and Sedum as well as the long-blooming Echinaceas.
Lilies make superb cut flowers. If you don't like to cut from your borders plant rows of Lily bulbs in a cutting bed or a corner of the vegetable garden.
Spring-planted Lilies will likely be a little shorter than expected their first year; the bulbs are so eager to grow they produce stems before they're fully rooted. In their second year in your garden the Lilies will achieve their full often majestic height. Orienpets and Orientals might benefit from staking in their second year especially if grown in part sun because they tend to lean towards the sunlight.
(Back to top)
Tips for growing Tomatoes
Click here for tips on growing Tomatoes.
(Back to top)
Tips for southern gardeners
Click here to learn tips on southern gardening.
(Back to top)
We're expecting a frost - How can I protect my new plants?
If a heavy frost is imminent cover the young growth with a light mulch of leaves or straw or apply a floating row cover. Remove this protection by mid-morning of the following day.
(Back to top)
What are the symptoms of overfertilizing?
Overfertilizing can cause young plants to die back rapidly. Leaves may yellow or brown right after your plants have been given fertilizer. Be sure to follow the manufacturer's recommendations for diluting liquid fertilizers and applying granular fertilizers.
(Back to top)
What are the symptoms of overwatering?
If plants wilt when the soil is moist they may be getting too much water; wait until the soil has dried 1in from the surface before watering. Overwatering can also cause leaves to turn yellow or black.
(Back to top)
What can I do to control aphids?
Aphids are small soft-bodied insects that can reproduce very rapidly and may transmit plant diseases as they feed on the sap of plants. Mix liquid dish soap and water in a spray bottle (about 1 teaspoon soap per quart of water) and spray your plant thoroughly. The soap coats the aphids' bodies and does not allow them to breathe. Spray plants again as necessary in several days.
(Back to top)
What is causing my clematis vine to wilt?
If your Clematis is wilting even though the ground is moist it probably has a fungal disease called "Clematis wilt." It usually strikes in late spring just as many varieties are beginning to bloom. If your Clematis wilted suddenly cut the vines back to healthy growth to the ground if necessary. An otherwise vigorous plant will respond from below the soil with new growth.
(Back to top)
What to do if you have to delay planting?
You can generally wait until it's convenient for you to plant - provided you store and care for your new arrivals properly.
Bareroot plants can remain in their original packaging for 5-7 days. Keep them cool (but above freezing) and out of direct sun. Stand them upright and check the plants for moisture every day. If dry add water and pour off the excess. Don't remove packing material until you're ready to plant.
If you must wait more than a week to plant a bareroot plant give it a temporary home using a practice called "heeling in." Dig a shallow trench in a lightly shaded area remove the packing material lay the roots in the trench and cover them with soil. Then water thoroughly. You can also put bareroot plants in a container - so long as water can drain out - and the roots are covered with potting mix. Heeled-in plants can remain in temporary quarters indefinitely but the longer you wait the more traumatic their relocation will be.
Pot-grown plants may remain in their original pots for 2-4 weeks. As plants grow however the need for water becomes more frequent. If you must delay planting for longer than a month we recommend shifting your plants into larger pots.
If you can't plant your bulbs right away be sure to open the bags or boxes in which they are shipped to allow air to circulate around the bulbs. The bulbs will keep for 1-2 weeks if stored dry at room temperature or a bit cooler. Storing bulbs for longer than 2 weeks may impair flowering or result in death.
Please note: Bulbs cannot be stored for months (or over the winter) before planting.
(Back to top)
What to do when your order arrives?
Click here to learn what to do when your order arrives.
(Back to top)
We recommend that you plant right away with the exception of some spring-shipped items (see below). The sooner you plant the sooner they will become established. Prompt planting in fall is especially important in cold climates. Plants and bulbs that are not well rooted before the ground freezes are unlikely to survive the winter.
Spring-shipped items: Bulbs and tubers that are not hardy in your area should be stored indoors until the danger of frost has passed or potted indoors first to get a jump on a short growing season. Plant annuals and tender perennials after the last frost date. Plants with leafy growth need 7-10 days to adjust to life outdoors before being planted. Once acclimated most perennials and shrubs with leafy growth will endure light spring frost (30-32°F) with little or no damage.
(Back to top)
Why didn't my new perennials or shrubs bloom the first year?
Many plants grow slowly and bloom sparsely if at all for the first year or two after transplanting. Once their roots have become established the plants take off with vigorous growth and abundant flowers. Your patience will be rewarded.
(Back to top)
GARDENING IN POTS
How to create a dramatic patio container
Click here to learn how to create a dramatic patio container.
(Back to top)
How to garden in containers
Click here to learn how to grow in containers.
(Back to top)
List of bulbs for forcing?
Click here for a list of bulbs for forcing.
(Back to top)
POLLINATORS
How to attract butterflies to your garden
Click here to learn how to attract butterflies to your garden.
(Back to top)
How to attract Hummingbirds to your garden
Click here to learn how to attract Hummingbirds to your garden.
(Back to top)
List of plants for pollinators that we offer
Click here for a list of plants for pollinators.
(Back to top)
List of plants in our pollinator garden
Click here for a list of plants in our pollinator garden.
(Back to top)
White Flower Farm does not use Neonicotinoids in their greenhouses or on their property. We practice Integrated Pest Management (IPM). Our plants are not certified organic because our nursery manager does occasionally use chemical fungicides to control diseases. The bulbs grown in Holland have not been treated with Neonicotinoids.
SOIL
How to compost
Click here to learn how to compost.
Plants grow best in soil that has been loosened before planting to allow ready penetration of the two things roots need most: oxygen and water. A shovel or spade is the tool of choice for breaking ground turning the soil and chopping up clods; a rototiller comes in handy for preparing a large area. Gardening books often recommend the arduous practice of double digging flower borders turning soil to a depth twice the length of a shovel blade. We get good results digging down just one shovel's depth. Unless your soil requires extensive rehabilitation you probably will too.
Unless you are planting a woody plant on its own (in a lawn for example) turn a healthy layer of organic matter - such as compost aged manure leafmold or peat moss - into your soil. Spread 3-4 inches of organic matter over the area to be prepared. Turn organic matter into soil to a depth of a shovel blade - approximately 10-12 inches.
Organic matter improves the drainage of heavy clay soils and helps light sandy soils hold moisture longer. It's the secret of success behind all the good gardens we know.
(Back to top)
We recommend that you visit your local Cooperative Extension Service to find out about soil testing in your area. Follow this link for a directory of institutions involved in the Cooperative Extension program.