Caring for your plants
It's often said that a person who grows plants with ease has a green thumb. William B. Harris, the co-founder of White Flower Farm, believed this old saying had the color wrong. Success with plants, he wrote, "comes from working with plants, from experimenting, personally, with their needs. It follows, I think, that a green thumb is a dirty thumb." If you hesitate, for lack of instruction, to get your thumbs dirty, or your past efforts have met with frustration, this article may be of help. It provides basic guidance on meeting the needs of your plants, getting them off to a good start, and tending them as they grow in your garden.
MEETING THE NEEDS OF YOUR PLANTS
Most plants are eager to grow. They, or their forebears, have survived millennia in the wild, persevering despite brutal competition, and they will thrive in your garden, so long as conditions suit them. Plants can't adapt to circumstances that differ widely from those in their native regions; they can't forget where they came from. So when you're considering a plant for your garden, begin by determining its needs and whether your garden provides for those needs. Talk to gardening friends, consult books, and peruse catalogues to learn all you can about where a plant is native and what growing conditions it requires. The crucial factors are sunlight and soil.
Sunlight
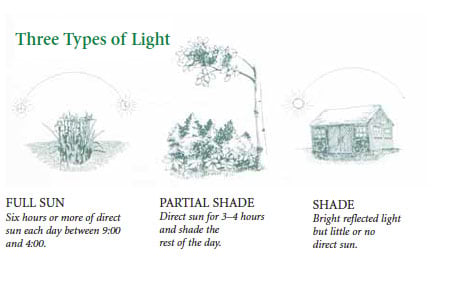
All plants require light to grow, but they vary in the amount they need. Some want to bake in direct sun all day. A few prefer deep woodland shade. Many perform well somewhere in between. In catalogue and book descriptions, the range of light is often broken down into three basic categories: full sun, partial shade (or partial sun), and shade (see the drawings below). Full sun is generally defined as 6 hours or more of direct sunlight between the hours of 9:00 and 4:00, when the light intensity is greatest. Partial shade means 3–4 hours of direct sun with shade, cast by a building or by trees, for the remainder of the day. Shade is described as bright reflected light but little or no direct sun. Please note that shade should not be confused with darkness. The gloom cast by spruces and other conifers is off the charts; note the absence even of weeds in such dense shade.
The lines drawn between these categories are not precise. Many plants thrive in a range of light conditions. Campanulas and Daylilies, for example, grow as well in partial shade as they do in full sun. Other plants, such as Astilbes and Thalictrums, require partial shade in average garden soil but grow in full sun if the soil is damp. There are also plants whose need for light varies with the climate in which they are grown. Aquilegias (Columbines) tolerate full sun here in Litchfield but prefer partial shade in the South. Part of the fun of gardening is trying new plants and trying them in new locations. They can always be moved if their first home isn't to their liking.
Gardeners faced with a shady property often throw up their hands in despair, devastated by their inability to grow plants that require sun all day. While it's true that the majority of plants want a fair measure of direct sun to grow and bloom, the number of shade-lovers, from Hostas and Ferns to Pulmonarias and Tiarellas, is larger than you might think. You can make a garden of rare beauty despite a leafy canopy if you seek out the plants that thrive in shade.
Soil
Soil serves as an anchor for roots and as a reservoir for the moisture and nutrients plants require to grow. We tend to take soil for granted, but for a plant, the type of soil–from heavy wet clay to bone dry sand—and its acidity or alkalinity govern whether the plant will prosper or languish. Before choosing plants for your garden, take time to learn more about your soil. It is possible to amend or improve your soil to some degree (see "Preparing soil for planting" section), but fundamental change requires a substantial investment of time, energy, and often money. It's best to start by choosing plants adapted to your native soil.
Soil is composed of mineral particles of various sizes and in varying proportions. For most garden plants, the ideal soil is an even blend of large particles (sand), mid-size particles (silt), and small particles (clay). Such a well-balanced soil holds moisture reasonably well between rains or waterings but allows the excess to drain away freely (the roots of most plants cannot survive in constantly wet soil). Soils frequently lean to one extreme or the other. Sandy soils drain well but dry out very quickly and are often low in nutrients. Clay soils tend to be rich in nutrients, but they retain water, suffocating the roots of plants that aren't adapted to heavy soils. Happily, there are plants that tolerate or even prefer dry or damp soils.
The other property of soil that affects plant growth is its acidity or alkalinity, which is measured on the pH scale (see the drawing) . The pH scale runs from 1 to 14. Seven is neutral. A soil with a pH of less than 7 is acid, and the smaller the number the more acid the soil is (5 is more acid than 6). A soil with a pH of more than 7 is alkaline, and the larger the number the more alkaline the soil is (9 is more alkaline than 8). Like the Richter scale for earthquakes, the pH scale is logarithmic, which means that there is a huge difference between numbers—6 is ten times more acid than 7, and 5 is 100 times more acid than 7. Most garden plants grow best in soils with a neutral to slightly acid pH but tolerate wider extremes.
Soil pH
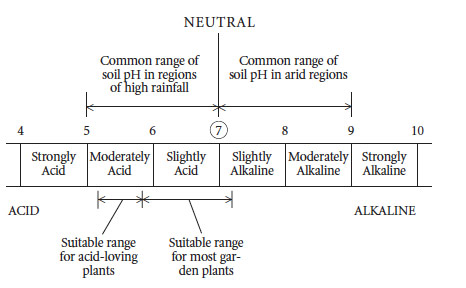
Soil pH is important because it controls the availability of nutrients required for growth. An "acid-loving" plant is unable to take up the nutrients it needs–even if those nutrients are available in abundance—if the pH of the soil is alkaline (or insufficiently acid). The converse is true for a "lime-loving" plant growing in acid soil. Both plants will appear stunted, and their leaves may yellow. In this weakened condition, they are more likely to fall prey to environmental stresses such as cold, drought, or pests.
You can't tell the pH of your soil by looking at it, and without some practice you may not be able to tell whether it's sandy or mostly clay by touching it, so how do you find out what sort of soil you've got? The answer is to have your soil tested. In most states, the Cooperative Extension Service—see the government pages of your telephone book under county offices or under the state departments of education or agriculture—offers soil test kits for a modest fee. A soil test will reveal the type of soil that you have and its pH, and give prescriptions for raising the pH of acid soil (by adding lime) or lowering the pH of soil that is too alkaline (by adding sulfur). A soil test also shows the levels of key plant nutrients and provides recommendations for remedying deficiencies.
PREPARING SOIL FOR PLANTING
The roots of most plants grow best in soil that is light and porous, but the soil most of us inherit with our property is neither. Instead, it is hard and dense, packed down by construction machinery, lawn mower wheels, and countless games of tag and touch football. Chiseled into such compacted soil, an infant plant struggles to survive, let alone grow and bloom. To make soil more hospitable for garden plants, you must dig and turn it, breaking up the big clods to create a loose and fluffy meringue.
Digging a bed is also the perfect opportunity to amend or improve soil. No matter what type of soil you have, it will benefit from the addition of organic matter, in the form of compost, leafmold, peat moss, or aged (not fresh) manure. Organic matter increases the water-holding capacity of sandy soil and improves drainage in a heavy clay soil. It also nourishes worms and the microscopic flora and fauna that live in the soil and help make plant growth possible.
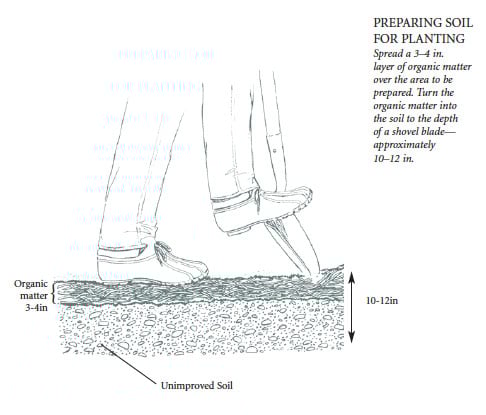
To prepare a garden for planting, begin by clearing the area of unwanted plants such as weeds or turf. Spread a 3–6″ layer of organic matter over the garden. Then sprinkle lime or sulfur and fertilizer, as recommended by a soil test, on top. Start in one corner and begin turning the soil with a shovel or spade (if you're preparing a large area, consider renting a rototiller). Work your way backwards (to avoid stepping in the soil you've already turned and compacting it again), methodically mixing the amendments and fertilizer into soil. When you've finished digging, use a rigid steel rake to smooth the soil, which will have puffed up above the level of the surrounding, unprepared soil. You'll be sweaty and dirty when you're done, but the reward—healthy, vigorous plants—is worth all the effort.
Gardening books often recommend the arduous practice of double digging flower gardens—turning soil to a depth twice the length of a shovel blade. Most gardeners get good results digging down just one shovel's depth. Unless your soil requires extensive rehabilitation, you probably will, too.
Digging a garden may be impractical or impossible in very heavy clay, in especially rocky soil, or in soil laced with tree roots. Under such circumstances, you can either construct a Raised Bed (a wood or stone frame filled with topsoil brought in by truck) or seek out plants adapted to such difficult growing conditions. Iris sibirica (Siberian Iris) varieties, for example, grow quite willingly in heavy soil; Artemisias and Achilleas thrive in dry soil; and Hostas are quite tolerant of one of the most difficult sites of all—dry shade.
PLANTING
Planting is simple if you follow a few basic steps that vary slightly according to the kind of plant and the form in which you purchased it. The following instructions accompany plants offered by White Flower Farm.
- Bulbs. Bulbs are easy to plant. With a trowel or bulb planter, dig a hole to the depth indicated on the plant label. Set the bulb in the hole with the roots down (if you can't find any roots, plant the bulb on its side). Then fill the hole with soil and water thoroughly. Bulbs grown in large, deep containers should be planted at the recommended depth. In small pots, they should be planted at one-half the normal depth.
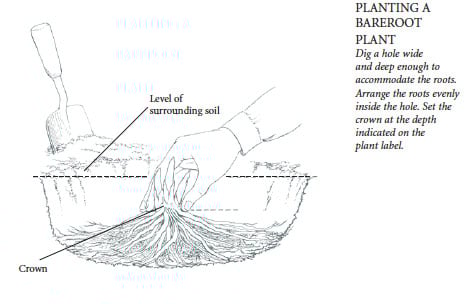
- Bareroot perennials. To plant a bareroot perennial, begin by unwrapping the plastic and removing (and discarding) the packing material that surrounds the roots. With a trowel, dig a hole wide enough to accommodate the spread of the roots and deep enough to allow you to set the crown—the point where the leaves or stems of the plant meet the roots—one inch below the surface of the soil. (Some plants require deeper planting, others more shallow planting—see the label that accompanies your plant.) Place the roots in the planting hole and arrange them like the spokes of a wheel or in whatever fashion appears natural (see drawing below). Holding the crown of the plant with one hand, push soil into the hole with the other, working soil around the roots to prevent the formation of air pockets. Then firm the soil around the crown, pressing down with both hands. Finally, water thoroughly—even if rain threatens—to settle the soil.
It's not always easy to tell which end of a bareroot plant is up. In their dormant state, some plants—Ferns and Liatris are good examples—may lack obvious roots. Look for buds or the remains of stems and leaves, and plant them facing up. When in doubt, lay the crown on its side; the plant knows to send shoots up and roots down.
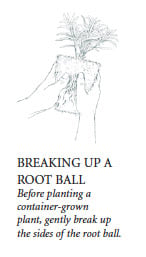
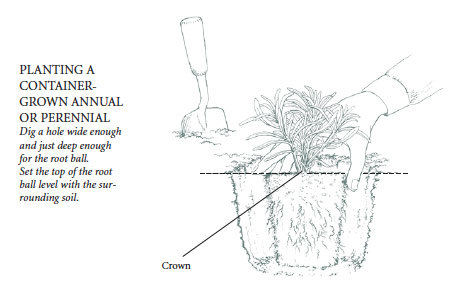
- Container-grown annuals and perennials. To plant a container-grown annual or perennial, first check the moisture of the potting mix in the container. Water thoroughly if it's dry. Then dig a hole large enough to hold the container (see the drawing below). Remove the plant from the pot by grasping the rim, turning the pot upside down, and tapping it against the heel of your hand. Next gently break up the sides of the root ball (the block of potting mix held together by the roots) with your thumbs and tease apart roots that are circling at the bottom (see drawing). This operation encourages the roots to grow out of the potting mix and into the surrounding soil. Set the root ball in the hole so that the top of the ball is level with the surface of the surrounding soil. Then push soil around and just over the top of the root ball, firm the soil with your hands, and give the plant a thorough soaking.
- Bareroot woody plants. Plant bareroot shrubs, trees, and vines as you would bareroot perennials, with three differences. First, before planting, remove (and discard) the packaging and soak the roots in a pail of water for a few hours. Second, take extra care when arranging the roots in the planting hole not to break them; the roots of many woody plants are brittle. Third, after planting, surround the main stem with a one- to two-foot diameter ring of soil mounded to catch and hold water and channel it down to the roots.
- Container-grown woody plants. Plant container-grown shrubs, trees, and vines that are destined for prepared beds, such as shrub or mixed borders, as you would container-grown annuals and perennials.
Container-grown woody plants that are to be planted in unimproved soil need different treatment. Begin by checking the moisture of the potting mix in the container. Water thoroughly if it's dry. Then dig a hole several times the diameter of the root ball but no deeper than the height of the root ball. Remove the plant from the pot and gently break up the sides of the root ball with your thumbs (you may find it easier to make several vertical cuts with an old kitchen knife) and set it in the center of the hole. Push soil back into the hole and just over the top of the root ball, firm the soil with your hands or feet, and soak with a hose set to a slow trickle. A ring of soil one to two feet in diameter mounded around the main stem will catch and hold water and channel it down to the roots.
For most woody plants, there is no benefit to amending the soil before planting. Rhododendrons, Azaleas, and Mountain Laurels are exceptions. They grow better if an acidic soil amendment such as peat moss (shredded pine bark is often recommended in the South) is worked thoroughly into the soil at planting time.
CARING FOR PLANTS THROUGH THE SEASONS
Watering
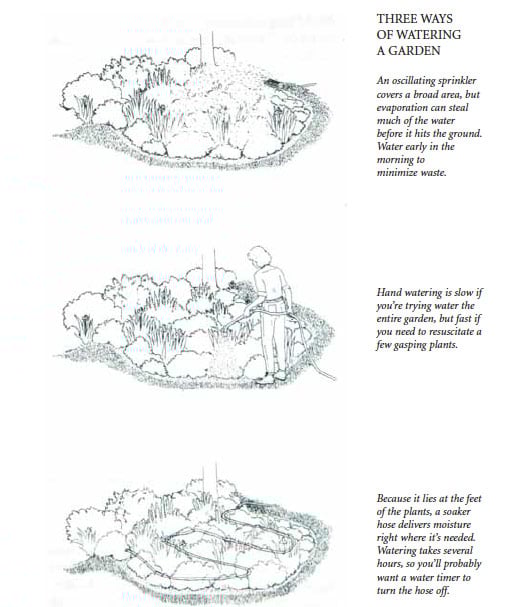
All plants need water to live, but only a few plants will grow in constantly sodden conditions. In waterlogged soil, water fills the air spaces, suffocating roots. Paradoxically, the first symptom of overwatering is wilted leaves. Seeing droop and assuming the cause to be lack of moisture, the well-meaning gardener keeps adding more water until the plant quite literally drowns.
To determine whether a plant needs water, look for signs of stress, then confirm your observations by checking the soil with your finger. If the soil is dry 1–2″ below the surface, water thoroughly. But if the soil below the surface is moist to the touch, don't water. The plant is probably wilting because the roots are unable to supply the top with sufficient moisture even though the soil is damp. An established plant generally perks up in a day or two. A new transplant should be provided shade from the afternoon sun for a week or so until the roots catch up.
The rule of thumb for most plants is one inch of water per week in summer, whether from the skies or the spigot, but air temperature and soil type can affect the need for water. Again, check the soil with your finger before you turn on the tap. When in doubt, don't water.
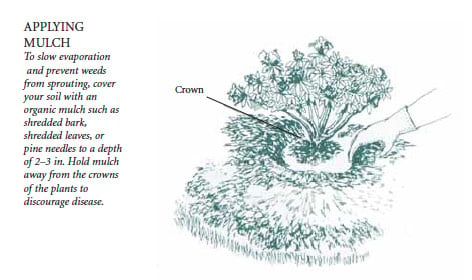
Mulch
Mulch is a loose material spread over the surface of the soil to slow the evaporation of soil moisture and to prevent weeds from sprouting. It also reduces erosion caused by heavy rains or irrigation. Many materials can serve as mulch, but the best for an ornamental garden are organic materials that are derived from plant products such as chipped or shredded bark (available in bags or in bulk at most garden centers), shredded leaves (whole leaves can form an impenetrable mat that prevents water and air from reaching the soil), or pine needles. These materials break down over time and help replace the nutrients taken up by the plants.
Mulch is easy to apply. Dump it in piles between the plants, then spread it evenly with your hands to a depth of about 2–3″. Keep the mulch a few inches away from the crowns of plants (see the drawing); moisture trapped against the crown can lead to rot. Because organic mulches decay and slowly disappear, you'll need to replenish them from time to time—usually about once a year.
Fertilizing
Unlike animals, which hunt or graze to obtain calories, plants manufacture their own food from sunlight, carbon dioxide, and water through the process of photosynthesis. To grow properly, however, plants must also take up more than a dozen nutrients from the soil. If any of these nutrients is in short supply, a plant may appear stunted or diseased, though all of its other needs have been met.
To find out whether your soil is deficient in a key nutrient, test your soil as recommended in the soil section. The test results will show the levels of several nutrients, including the big three: nitrogen (often abbreviated with its chemical symbol, N), phosphorus (P), and potassium (K). Nitrogen is essential for leaf growth. Phosphorus is required for root growth and the production of flowers. Potassium is vital to a variety of plant functions. A soil test will also provide recommendations for correcting deficiencies, usually with through the application of fertilizers—materials that contain one or more essential plant nutrients.
At the garden center, you'll find a dizzying array of fertilizers to choose from. Check the packages for three numbers (such as 5-10-5), which indicate the percentage, respectively, of Nitrogen, Phosphorus, and Potassium. Bring your soil test results with you and use them as a shopping guide.
Once you've addressed significant imbalances in your soil, you may still need to fertilize your plants on occasion. Most established plants grow best if fertilized with a light hand. We fertilize borders, specimen trees, and shrubs just once a year—in early spring. We carry buckets of a balanced granular fertilizer (such as 10-10-10 or an organic fertilizer) out to the garden and scatter it by hand (always wearing gloves) the way a farmer scatters chicken feed. Our aim is light but even coverage of the soil. For most plants (Roses are notable exceptions), this single feeding is enough. Many concentrated, water-soluble fertilizers are also available, formulated for use on different types of plants. We think they are best reserved for plants in containers. Follow the manufacturers' directions carefully when mixing and applying these solutions.
We don't recommend fertilizing at planting time because some fertilizers can injure roots. We also don't recommend fertilizing perennials, shrubs, and vines during their first growing season. They need time to settle in before being pushed to grow.
Please note that more is not better when it comes to fertilizing. Too much fertilizer can lead to soft, lanky growth that is susceptible to pests and diseases, and chronic overfeeding can kill a plant outright.
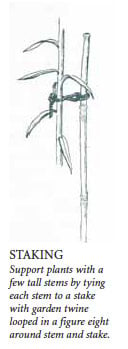
Staking
 Some plants need extra support. Gravity, wind, and rain can topple tall plants such as Delphiniums and those with very heavy blooms such as Peonies. Sun-lovers such as Heliopsis and Boltonia, when grown in a bit of shade, may lean to the point of collapse as they reach in the direction of the light. Staking--with sticks and string and loops and grids—helps keep plants standing up.
The goal in staking is to provide support while retaining a plant's natural habit. That balance will become easier as you become familiar with your plants and the various staking methods. You're more likely to achieve a natural look if you stake a plant early in the season, while it's still small. It's hard to prop up a fallen plant in an elegant manner.
There are three basic staking techniques, each designed to support a different category of plants.
- Plants with tall single stems such as Delphiniums, Hollyhocks, Lilies, and Thalictrums are best supported with individual bamboo or plastic-coated metal stakes. After the stems have elongated, but before bloom, push a stake into the ground near each stem and tie the stake to stem just below the flower buds with green twine. Tie tightly enough to hold the stem, but not so tight that you strangle it. Loop the twine into a figure eight before tying to permit the stem to sway a bit in the
breeze without breaking.
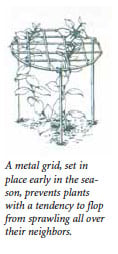
- Plants that tend to fall open as the season progresses need support early to stay full. Metal grids, such as Grow-through Supports, are ideally suited to the task. As Peonies, Dahlias, Physostegias, and Salvias show growth in the spring, position the grids over them. The framework is soon engulfed by the foliage but continues to support the leaning stems.
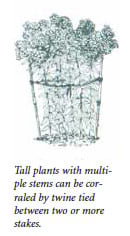
- Plants with multiple tall stems such as Boltonia, tall Asters, Garden Phlox, and Sedum 'Autumn Joy' are best corraled by twine tied between two or more stakes or caged in cylinders of chicken wire. If set in place early, the supports are soon hidden by leaves.
Deadheading annuals and perennials
 "Deadheading" has a sinister ring to it, but it describes a beneficial gardening practice: the removal of spent flowers. Deadheading has two main functions. It makes most plants look neater, and it prevents them from making seeds and scattering them around the garden. For some plants—Achilleas, Coreopsis, and Lamiums, for example—deadheading may also prolong bloom or encourage a second round of flowers later in the season.
There are no set rules for deadheading (gardeners sometimes disagree vehemently over the best technique for a given plant), but it's possible to divide plants into three basic categories.
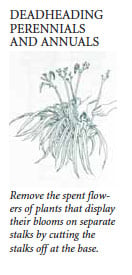
- Plants that produce blooms on a separate flower stalk. Daylilies, Hostas, Alchemillas, Digitalis, and Irises belong in this group. When the flowers have faded, cut the flower stalk off at its base or just below the canopy of leaves.
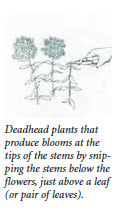
- Plants that produce flowers at the tips of the main stems. This group includes Asters, Lilies, Phlox, and Peonies. Cut each stem below the spent flower or cluster of flowers, and just above a leaf or a side branch so the cut will be unobtrusive.
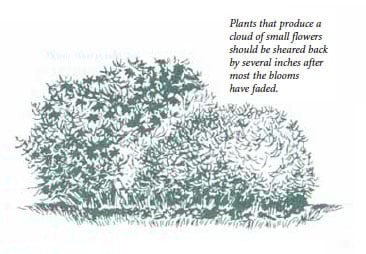
- Plants that make clouds of flowers. It's far too tedious to remove the spent blooms of Geraniums (hardy Cranesbills), Gypsophilas, Nepetas, and Coreopsis verticillata varieties one by one. Wait until all but a few blooms have faded, then shear the stems back by one-quarter or one-half. Most Geraniums and Nepetas should be cut almost to the ground after flowering. Fresh growth will soon appear.
 Some faded flowers are worth saving. Ornamental grasses that flower in late summer, such as Miscanthus, are often grown for their feathery plumes, which add interest to the garden in fall and winter. The russet flower heads of Sedum 'Autumn Joy' stand out beautifully against newly fallen snow. Wait until late winter or very early spring—before new growth begins to emerge—to cut the old stems to the ground.
Pruning shrubs
Pruning is the removal of branches or portions of branches to control the growth of a woody plant, to keep it in good health, or to accentuate its natural beauty. You may tremble at the prospect of taking your pruning shears to a prized shrub, but by studying the fundamentals of pruning, learning how a shrub grows, and working slowly and thoughtfully, you'll soon gain confidence and wonder why you ever hesitated. (Please note that the practices described here apply to deciduous and broad-leaved evergreen shrubs. Most needled evergreens—conifers—are trickier to prune and so should be allowed to grow naturally.)
Late winter is the best time to prune most shrubs. They are full of energy stored from the previous summer and ready to put on a burst of growth with the arrival of warm weather. The loss of a few branches, even major ones, at this time of year won't compromise a plant's health. It's also easier to see the structure of a deciduous shrub when it is bare of leaves. For spring-blooming shrubs, however, a late-winter haircut has an important drawback. When you prune, you can't help but remove flower buds formed the previous summer. If you're giving a spring-blooming shrub more than a light trim, you should wait to cut until after the flowers fade.
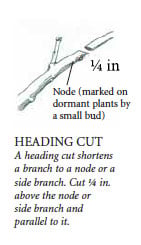
In pruning, there are two basic cuts. A heading cut shortens a branch to just above a node (the point where a leaf joins a branch–marked by a small bud on a dormant deciduous shrub) or to a side branch. A thinning cut removes a branch at its point of origin–at a branch union (a "Y") or at ground level. Heading cuts stimulate abundant new growth from buds and branches near the cut, making the plant more dense. Thinning cuts open up the center of the plant without stimulating too much new growth. In both cases, you should make cuts about 1/4 inch above the node, side branch, or branch union and parallel to it. Cutting more closely impairs the ability of the plant to heal the wound you are making. Leaving a longer stub invites rot.
Before you start cutting, stand back and look at the shape of the plant and decide what you want to accomplish. Then begin by removing dead or damaged branches and branches that are rubbing the bark off their neighbors. Next thin the branches in the center of the shrub to relieve congestion and allow light and air to penetrate the interior. Step back and take a look at what you've done. Now proceed to shape the shrub. Pause often to monitor your progress at this stage, or ask your spouse or a friend to give you guidance. Although you can't reattach a branch you wish you hadn't cut, don't be afraid to learn by doing. Most plants will outgrow your early mistakes.
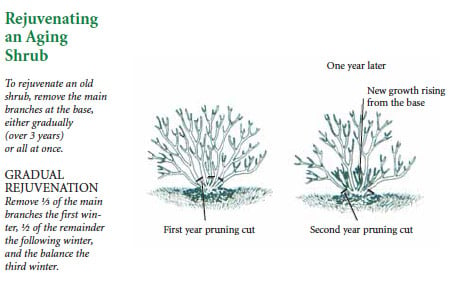
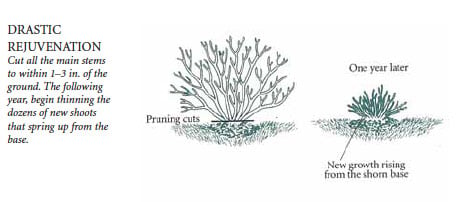
Old, overgrown shrubs require a different approach to pruning. Rather than tinkering around the edges, they need renewal or rejuvenation, which means cutting the main branches off at the ground to encourage new, healthier, and more productive shoots to emerge and take their place. There are two ways to renew an old shrub. One is to remove about a third of the oldest branches each year. After three years, all of the growth will be new, and you can put the shrub on an annual pruning regimen. The faster but more drastic way to rejuvenate a shrub is to bite the bullet on a sunny day in late winter and cut the entire plant to the ground. The plant will respond by sending up a dozen or more new shoots that you must thin and shape over the next several winters.
Dividing perennials
 We tend to think of perennials as plants that look the same year in, year out, but in fact, they change with time. Many grow steadily larger, exceeding their allotted space and encroaching on less vigorous neighbors. Others perform brilliantly the first or second year after planting, then decline. The way to control an overly enthusiastic perennial or to rejuvenate one that's past its prime is to dig it up and divide it, cutting it into smaller pieces that, with a little care, soon recover and thrive on their own.
The best time to divide perennials depends on your climate. Here in Connecticut, we have the luxury of choosing between early spring (usually mid to late April) and fall (late August through September). In colder climates, spring division is preferred because it allows plants plenty of time to settle in before winter. In hot-summer climates, fall is the best time to divide; plants divided in spring may not become established before the arrival of the heat. A few plants insist on their own timetable. Peonies and Bearded Irises, for example, prefer to be divided in late summer or fall. They won't bloom again until the following year if divided in spring.
To divide perennials, you'll need a few basic tools, including your bare hands (which may be all that's required to pull apart a mat of Coreopsis 'Moonbeam'). You'll need a sharp spade to slice through big clumps of Daylilies or Asters, an axe to chop up the woody crown of an overgrown Miscanthus Grass, an assortment of old kitchen knives for smaller clumps, and an old saw to cut your way through the heart of an Astilbe. A plastic tarp spread out in a shady corner serves as an excellent work space.
Begin by digging the plant out of the ground (if you are dividing in fall, the first step is to cut back the top growth to just a few inches). Then dig the plant out of the ground and clean the soil from the roots by shaking the plant vigorously, dropping it on the ground, or washing the roots off with a stream of water—whatever it takes to get a better view of the roots and the crown. Next, look for natural divides in the crown and cut the plant into from two to four large pieces. You can cut these pieces into smaller pieces and keep on cutting, if you want, provided each piece has both roots and top. Unless you intend to start your own nursery, you'll probably want to stop dividing when you have several well-rooted chunks. Replant them promptly (and don't forget to share the wealth with your gardening friends).
Pest and disease control
Like many gardeners, we were once quick to reach for pesticides—some of them bearing very dire warnings on their labels--at the first sign of insect damage or disease problems in our gardens. Today we are aware of the hazards of indiscriminate spraying to organisms we want to encourage (not to mention to ourselves and to wildlife), and so we now follow the more measured approach outlined below. Years of success allow us to recommend it to you.
- Meet the needs of your plants. Plants are less likely to suffer from pests and diseases if they get the light, air, water, and nutrients they need to thrive. If you have a plant with a consistent problem, learn more about its needs and address them. In many cases, the solution is to relocate the plant to another part of your garden.
- Practice garden sanitation. Uproot and destroy infested plants to prevent pests and diseases from spreading. In fall, pull up annuals, cut down all but evergreen and semiwoody perennials (see "Preparing the garden for winter" section), and rake up leaves to remove cover for overwintering insects and diseases.
- Learn to identify pests and diseases. Before deciding whether to attempt to control a pest or disease, you must identify it. Different measures are effective against different pests. For example, an insecticide may be ineffective in controlling mites, which aren't insects (they are spider relatives). It's also true that some quite ferocious-looking bugs are harmless or even beneficial to plants, so be sure you've identified the real source of the problem before you decide whether to act.
If you can't figure out what's causing the problem, try calling your local Cooperative Extension office for advice. They often have trained horticulturists or volunteers (called Master Gardeners) available to help. If you're stumped by a problem with a plant you purchased from White Flower Farm, we invite you to call our Staff Horticulturist at (860) 496-9624. There is no charge for this professional assistance.
Use the least toxic control. Attempt to control pests and diseases only when they threaten the health of a plant (a little nibbling doesn't warrant intervention), and then choose the least toxic control available. Many biological pesticides have proved very effective in our gardens. The least toxic approach is to banish a long-suffering plant from the garden and grow something else instead. (If you do use pesticides, please follow the instructions on the labels carefully.)
PREPARING THE GARDEN FOR WINTER
In most climates, the first hard frost signals the end of the gardening year. There may yet be plants to bloom, but even those that don't succumb to the cold are beginning their preparation for dormancy by dropping their leaves or collapsing in a heap. It's time to do some housekeeping and prepare for the arrival of winter. The housekeeping chores can wait until spring, but most gardeners prefer to tackle them in fall. Spring is busy enough without having to deal with last year's loose ends, and there is something satisfying about clearing away all of the leaves and stems and seeing the clean outlines of the garden again.
- Pull up annuals and tender perennials. As the annuals are killed off by frost, pull them up, shake the soil from their roots, and toss them on the compost pile. If you have a few treasures you'd like to overwinter, lift and pot them before frost, and set them on a sunny windowsill.
- Dig and store tender bulbs. If Dahlias, Gladiolus, or other bulbs are tender in your climate, you can dig and store them indoors, then replant them the following spring. The cultural instructions on our Web site provide overwintering instructions for bulbs we offer.
- Cut down perennials. With a pair of pruning shears (or hedge shears, if you've got a large garden) cut most perennials down almost to the ground, and toss the stems onto the compost pile. Spare plants with attractive seed heads, such as ornamental Grasses, Rudbeckia, Perovskia, and Sedum 'Autumn Joy,' and those that are evergreen such as Dianthus and Digitalis.
- Rake up piles of leaves. Rake accumulations of tree leaves out of the garden beds. Leaves that have been shredded by a lawn mower or shredder make a good summer mulch, but mats of whole leaves can smother perennials in winter.
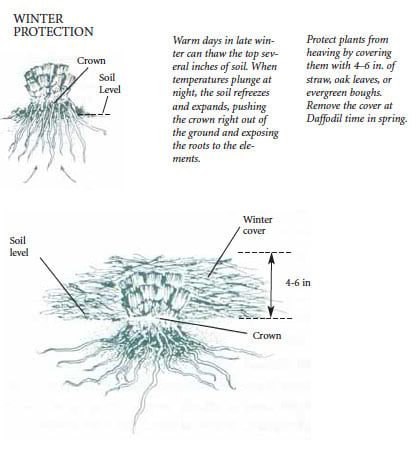
- Where winters are severe, put down winter protection. In cold-winter climates such as ours (Zone 6 [-10°F]), alternate thawing and freezing of the soil in winter can heave the crowns of newly planted perennials and small shrubs right out of the ground, leaving their roots vulnerable to drying winds and freezing cold. To protect plants from heaving during their first winter, put a four- to six-inch layer of loose organic material such as straw, oak leaves, or evergreen boughs (cut into one- to two-foot lengths) over the crowns after the ground freezes (generally in December here in Litchfield). Take care to avoid covering the evergreen foliage of plants such as Digitalis and Dianthus. This cover is intended not to keep the plants warm but rather to keep the soil evenly frozen until spring.
Preparing the garden for spring
As winter gives way to spring, it's time to go back into the garden and prepare for the new gardening year.
- Cut down perennials left standing over winter. Remove the old stems before the new growth gets too far along and complicates the job.
- Rake out leaves blown into beds by winter winds. No matter how thorough your fall cleanup has been, winter winds always find more leaves and drive them into your garden.
- Prune shrubs and vines. See "Pruning shrubs" section for basic pruning techniques.
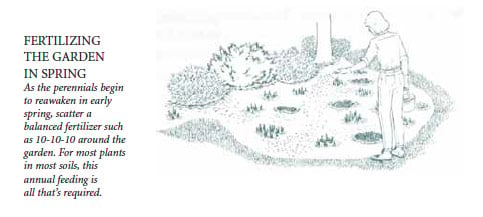
- Fertilize the garden. Early spring is the best time to scatter a balanced fertilizer in your flower beds and around flowering trees and shrubs in the lawn. (See the drawing and "Fertilizing")
- Remove winter cover. If you put down a layer of straw, leaves, or evergreen boughs in fall for winter protection, gradually remove it as frosts become infrequent, usually at about the time Daffodils and Forsythias are in bloom.